Turn Wood Into Gasoline: How Wood Gasifiers Generate Power When Fuel Runs Out
Introduction
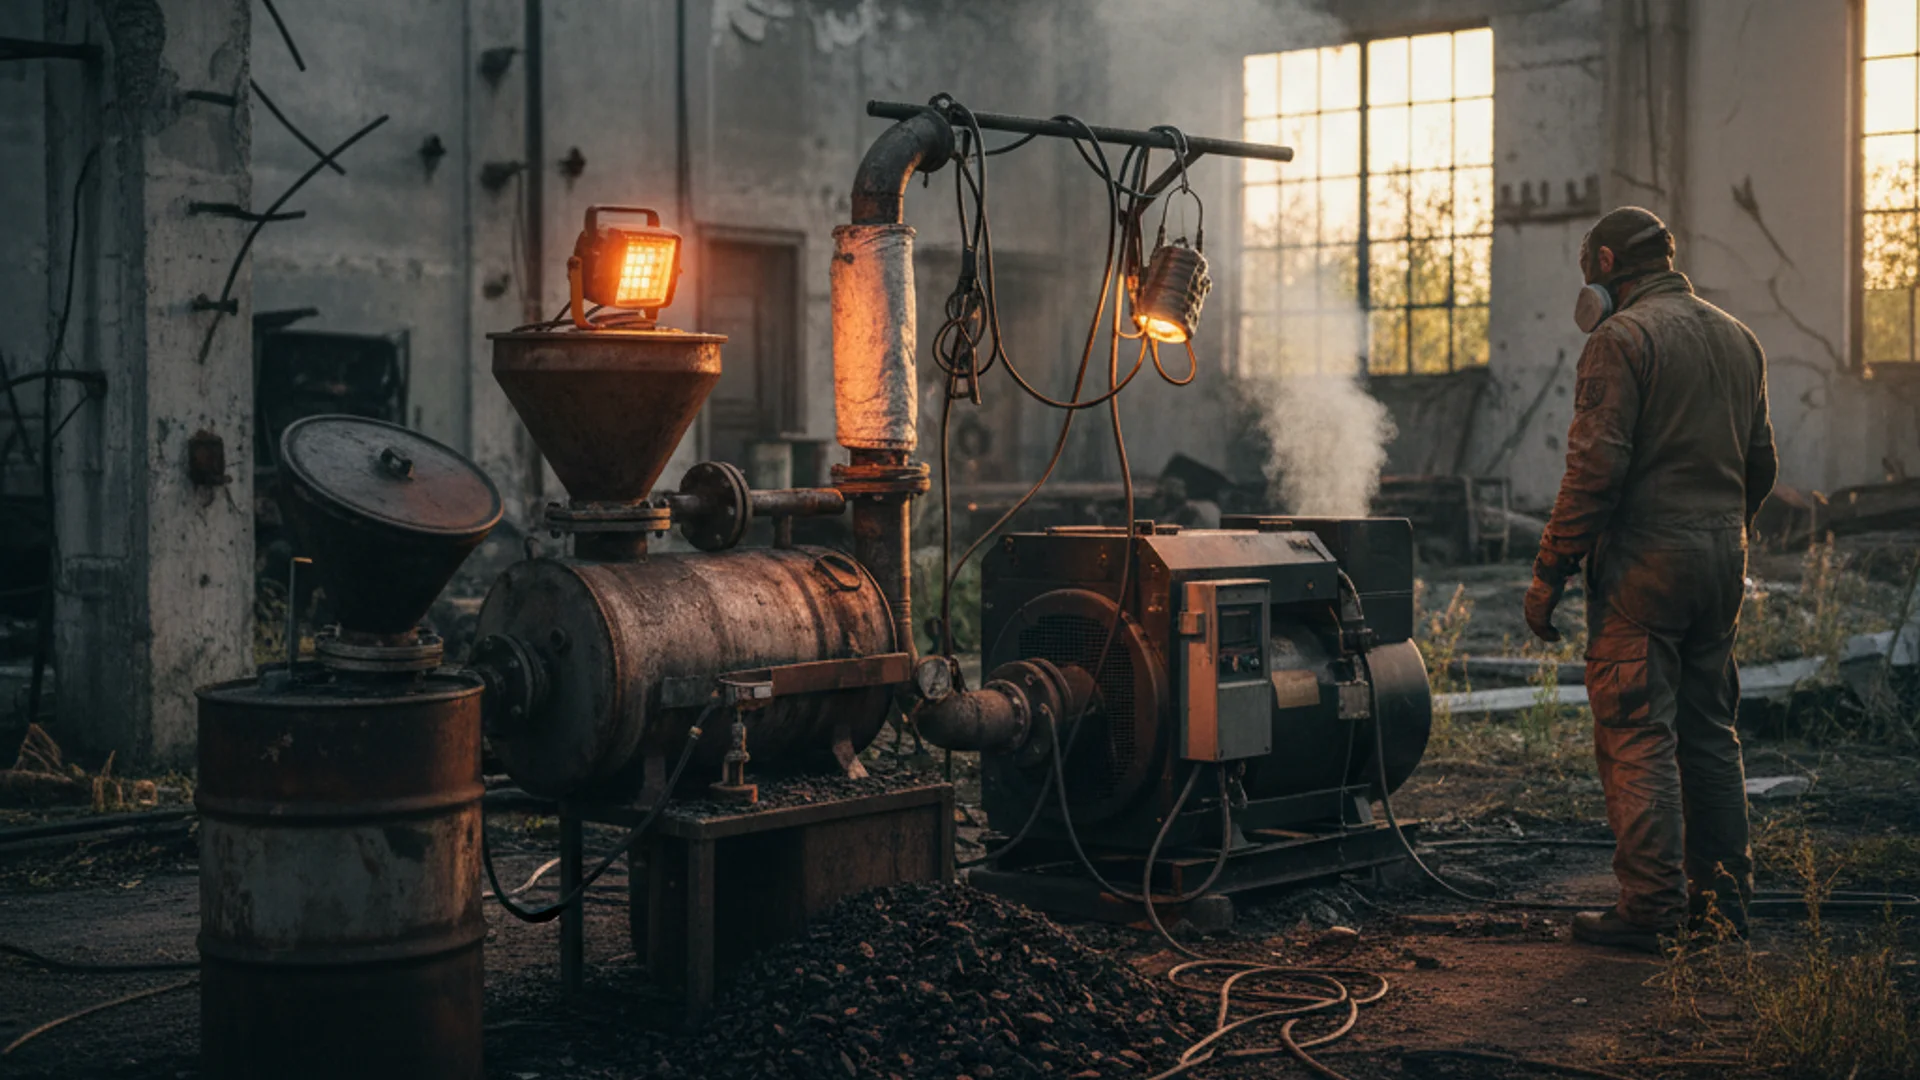
You've seen the Mad Max movies. You've read the prepper forums. You know the grid's fragile and fuel runs out fast when supply chains break. But here's something most people don't know: during World War II, more than one million vehicles kept running after petroleum disappeared. Not on ethanol. Not on solar panels. On wood. They called them producer gas vehicles, and by 1945, 80% of Finland's cars and trucks ran on gasifiers bolted to their frames, burning through more than 2 million cubic meters of wood in 1944 alone. Sweden had 73,000. France had 65,000. This wasn't experimental technology—this was farmers and taxi drivers keeping their livelihoods alive by feeding wood chips into steel drums that turned solid fuel into combustible gas. The entire transition happened in two years because it had to. Wood gasification works. It's proven under the worst conditions imaginable. And if you've got access to trees, a welder, and some scrap steel, you can build a system that generates power when everything else goes dark. This isn't theory. This is chemistry you can touch, and I'm going to show you how it actually works—where it fails, where it succeeds, and what you need to know before you strike the first arc.
Your First Win: Understanding What Wood Gas Actually Is (5 Minutes)
Before you start cutting steel or shopping for parts, you need to understand what you're building. Wood gasification isn't burning wood to make steam. It's not distilling alcohol. It's controlled incomplete combustion that transforms solid biomass into a gas your engine can drink. Here's the breakdown by weight: 20% hydrogen, 20% carbon monoxide, 50-60% nitrogen, and a trace of methane. That's your fuel. The carbon monoxide and hydrogen are the combustible components—the stuff that makes power. The nitrogen is inert ballast that came in with the air. This is why wood gas gives you about 30% less power than gasoline: you're diluting the fuel with atmospheric nitrogen that doesn't burn. The chemistry happens in stages, and each stage needs a specific temperature range. At 100°C, the wood dehydrates. At 200-300°C, pyrolysis begins and the wood starts breaking down into char and volatile gases. At 800-1200°C, gasification occurs—this is where carbon reacts with oxygen, carbon dioxide, and water vapor to create your combustible gases. The hottest zone, the reduction zone, hits 1400°C. That's where carbon dioxide gets converted into carbon monoxide, and water vapor splits into hydrogen and more carbon monoxide. You don't need to memorize the temperatures. What you need to remember is this: wood gasification is a thermal ladder. You're not just burning wood—you're walking it up a temperature gradient until it cracks apart into molecules small enough to burn in an engine. Every stage matters. Skip one and you get tar, smoke, and a clogged system. Here's your five-minute win: go find a piece of dry hardwood and a candle. Hold the wood above the candle flame (not in it) and watch what happens. You'll see smoke rising off the wood before it ignites—that's pyrolysis, the volatiles escaping. When the wood finally catches fire, you're seeing gasification in action.
The flame isn't burning the solid wood directly; it's burning the gases the heat is pulling out of the wood. That's the process you're going to scale up and control. This is the conceptual foundation. A gasifier is just a steel box that manages these temperature zones, controls airflow to keep combustion incomplete, and captures the gas before it burns away into the atmosphere. You're not inventing new chemistry—you're just building a container that lets the chemistry happen in the right order.
Two Designs: The Emergency Hack vs. The Proven Workhorse
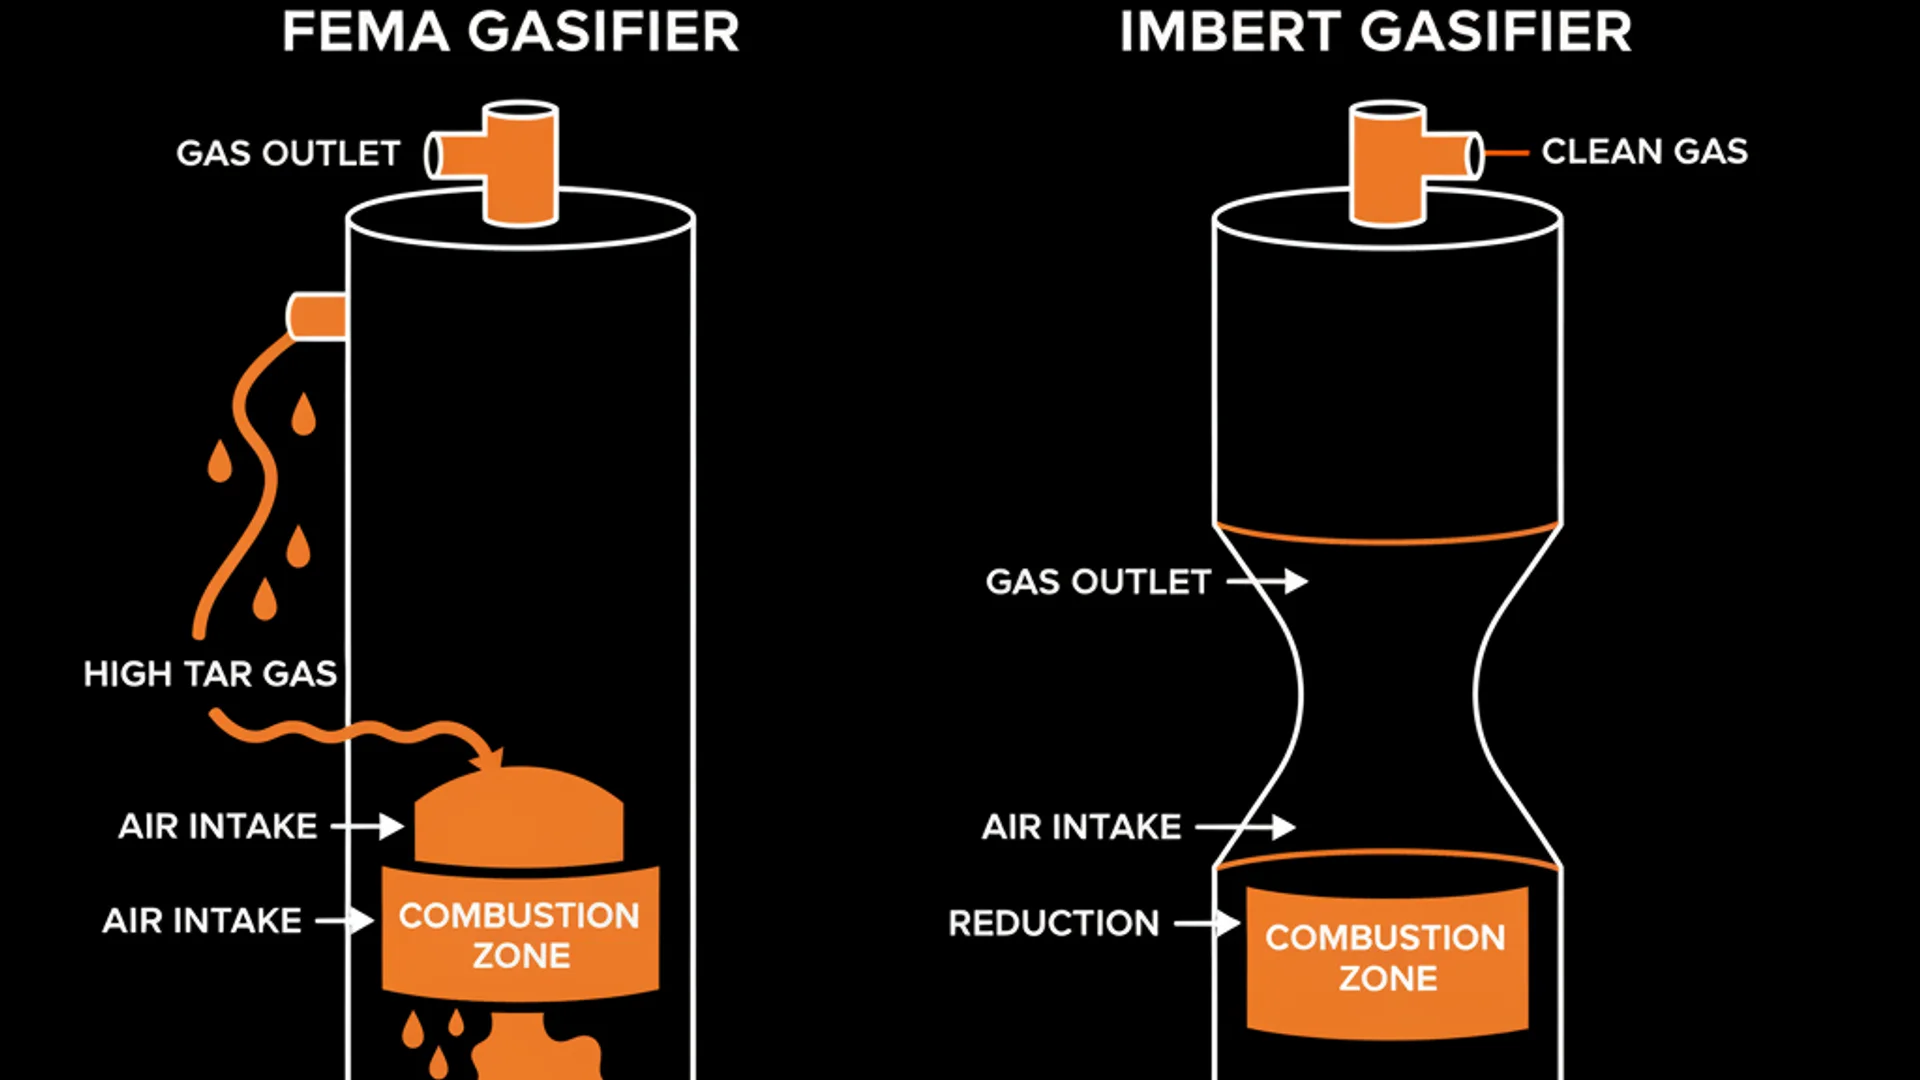
The wood gasifier world has two camps, and you need to know which one you're joining before you start welding. The first is the FEMA gasifier. The Federal Emergency Management Agency published detailed plans specifically for grid-down scenarios when conventional fuel vanishes. The goal was simple: get vehicles and generators running fast using ordinary hardware you can scavenge. The FEMA design works—it will produce combustible gas—but it has one massive problem: tar. Tar is the gasifier builder's nightmare. It's the sticky, viscous byproduct of incomplete pyrolysis, and the FEMA gasifier generates a lot of it. Tar doesn't burn cleanly in your engine. It accumulates. It gums up valves. It clogs filters. It turns your pistons into glue traps. Experienced builders will tell you the FEMA gasifier is an emergency unit and should be used as nothing more—it'll get you running when the alternative is staying put, but you'll be tearing down your engine for cleaning constantly. The second design is the Imbert gasifier, and this is where serious builders land. French engineer Georges Imbert cracked the tar problem in 1920 with one elegant insight: strategically placed air nozzles at a restriction point. Here's why it matters. In the FEMA design, air enters at the bottom and the combustion zone moves around depending on how hard you're sucking gas out. That means tar produced higher up in the reactor can escape without passing through the hottest zone where it would crack apart and burn. The Imbert design forces all the gas through a constriction where air nozzles inject oxygen right at the hottest point. Every molecule of tar has to pass through this oxidation zone to exit the gasifier, and the intense heat breaks the tar into simpler gases.
You get an oxidization zone regardless of suction applied, and nothing above the restriction matters because there is combustion air in the one place that all the tars have to go to get out of the machine. So which one should you build? If you're staring at a genuine emergency—fuel stopped flowing last week and you need to get your truck running to evacuate or haul supplies—build the FEMA gasifier. The plans are free, the parts are simple, and it'll work well enough to get you moving. But if you're building now, while you still have time to screw up and learn, build an Imbert-style gasifier. The investment in understanding the nozzle placement and restriction geometry will pay off in cleaner gas, less maintenance, and an engine that doesn't die after 50 hours of runtime. One more thing the WWII builders proved: shape, form, and construction material had little effect on performance. You can use a 5-gallon steel drum, a propane tank, or a section of heavy-wall pipe for your reactor shell. The millions of gasifiers built under wartime scarcity were made from whatever steel people could find, and they worked. Don't get paralyzed trying to source perfect materials. If it's steel and it can handle 1400°C without collapsing, it'll do the job.
Fuel: The Mistake That Kills Most Builds
You can build a perfect gasifier and still fail if you feed it the wrong fuel. Wood gasifiers are finicky bastards about what they eat, and this is where most DIY projects stall out. First rule: bone dry. Moisture content must be below 25%, and below 20% is better. When wet wood enters the reactor, the heat that should be cracking fuel into gas gets wasted boiling water instead. You end up with weak gas, temperature drops in the critical zones, and tar production skyrockets. Store-bought wood pellets are your friend here—they're manufactured to 6-8% moisture content and they're uniform. Second rule: uniform size and shape. The Imbert design relies on gravity feeding blocky fuel down through a constricted hearth. If you dump in twigs, bark shreds, and random chunks, the fuel column bridges—it forms a hollow cavity and collapses unevenly, disrupting airflow and creating cold spots. Cold spots mean unburned tar. You want pieces that are roughly the same size, somewhere between 1 to 3 inches, and chunky rather than stringy. Third rule: hardwood beats softwood. Hardwoods have higher density and produce more gas per volume. Softwoods work, but they burn faster and produce more tar because of their resin content. Pine is marginal. Oak, maple, birch—these are your targets. If you're processing your own fuel, split it into uniform chunks and let it season for at least a year in a covered area with airflow. Now let's talk about energy density because this determines how much fuel you're hauling around. The rule of thumb: 20 pounds of wood equals roughly 1 gallon of gasoline in energy content. Put another way, 1,000 kilograms of wood gives you the same mileage as 365 liters of petrol.
If your truck gets 15 miles per gallon on gasoline, expect about 15 miles per 20 pounds of dry wood on wood gas—but remember you're losing 30% power, so performance won't feel equivalent even if range is similar. For a vehicle application, this becomes a logistics problem fast. If you're planning a 100-mile trip, you need about 130 pounds of dry wood. That's space and weight you're dedicating to fuel storage. The WWII operators dealt with this by mounting large hoppers on truck beds and running shorter routes with frequent refueling. For stationary generator use, it's less of an issue—you can stack cord wood next to the unit and feed it as needed. Here's the mistake I see constantly in forums: someone builds a beautiful gasifier, loads it with green firewood they just chainsawed, and then posts confused questions about why they're getting weak gas and black tar pouring out of their filter system. Your fuel preparation matters as much as your reactor design. Budget time and space for drying and processing fuel, or just buy bagged wood pellets and skip the headache while you're learning.
The Middle Stage: Where Your Engine Lives or Dies
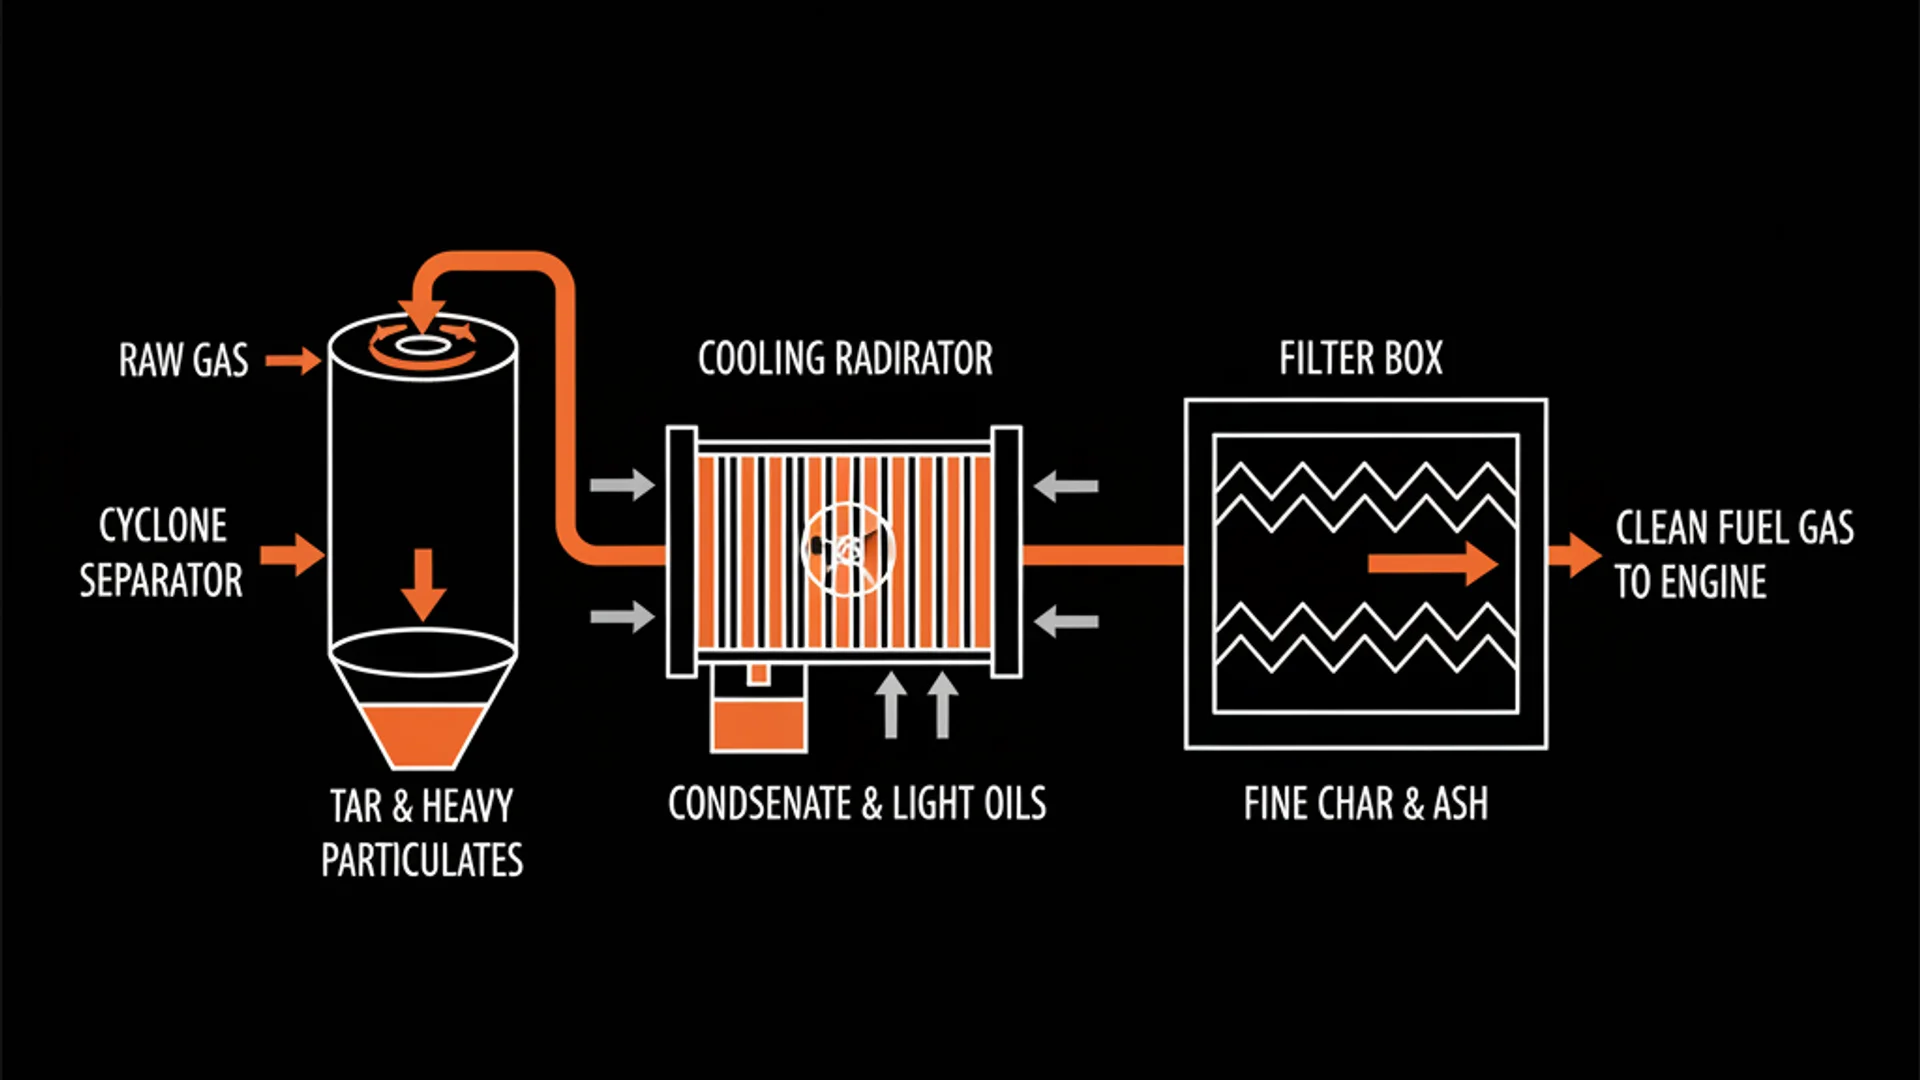
The gas coming straight out of your reactor is hot, dirty, and full of particulates and tar vapor. Shove that directly into your engine and you'll destroy it in hours. The filtration and cooling system is what separates a functioning gasifier from an expensive mistake. You need three things: cooling, tar condensation, and particulate filtration. They happen in that order. First stage: cyclone separator. Run the gas output pipe through the side of a tank at an angle to initiate a swirl. The gas spins like a tornado, and centrifugal force throws heavier particles and tar droplets to the outside wall where they fall to the bottom. Run your exit pipe through the top of the tank, but position the intake end about 2 inches from the bottom—this keeps the settled crud from getting pulled back into the gas stream. The tank needs a drain at the very bottom so you can periodically dump the accumulated tar and ash. Second stage: cooling radiator. This is where temperature management happens, and temperature directly affects your power output. The ideal gas temperature at your carburetor inlet is 70°F. For every 10 degrees above that, you lose an estimated 1% horsepower. Gas exits your reactor at 800-1200°C. You need to drop it by over 1000 degrees. An old automobile radiator works perfectly. Mount it vertically or at an angle with the gas flowing through the core. As the gas cools, water vapor and any remaining tar condense back into liquid form. Run the bottom of the radiator into a collection jar—you'll be draining nasty brown tar-water out of this regularly. Some builders add a small 12V fan to blow air across the radiator for faster cooling, but natural convection works if you size the radiator large enough. Third stage: filter box. This is your last line of defense against particulates that will sandblast your engine's internals. A 5-gallon metal bucket works.
Fill it with wood shavings, sawdust, or cloth strips—these trap fine ash and char particles. Some builders use steel wool, which works better but costs more and poses a fire risk if hot embers make it through your cyclone separator (they shouldn't, but failures happen). The gas enters at the bottom of the filter bucket, percolates up through the media, and exits at the top. Pack the media loosely enough for gas flow but densely enough for filtration. You'll need to replace or clean the filter media periodically—how often depends on your fuel quality and how well your upstream systems are working. If your filter is clogging every hour, your problem is further back in the chain. Every connection between stages needs to be airtight. Wood gas is about 20% carbon monoxide, and leaks will kill you (more on that in a minute). Use high-temperature gaskets on the reactor connections, hose clamps on everything else, and pressure-test your system before you start the engine. Spray soapy water on every joint while the gasifier is producing gas—bubbles mean leaks, and leaks mean either air getting in (which dilutes your gas and drops power) or carbon monoxide getting out (which poisons you). This middle stage is where craftsmanship matters more than the reactor itself. The reactor is just controlled burning. The filtration and cooling system is precision engineering that determines whether you're running clean gas into your engine or feeding it a toxic slurry that'll seize your valves and score your cylinder walls. Don't half-ass this part.
Running the System: Startup, Operation, and What to Expect
You've built the reactor, installed filtration, and plumbed everything together. Now comes the moment where theory meets fire. Startup procedure: Fill your reactor with dry fuel. If you're using an Imbert design, load it all the way to the top of the reduction zone—the fuel column needs weight to feed down through the constriction. Open your ignition port (usually a small hatch or removable plug near the bottom of the reactor). Insert a propane torch or burning paper to ignite the char layer at the bottom. Close the ignition port. Turn on your blower or start manually pulling air through the system. You'll see smoke at first—lots of it. This is normal. The system is heating up, and the volatiles are coming off before the reduction zone gets hot enough to crack them into clean gas. This takes 5-15 minutes depending on reactor size. As the temperature climbs, the smoke will thin out and eventually become almost invisible. That's your signal that you're producing quality gas. Test before you connect to your engine. Run a flare tube—just a metal pipe extending from your gas output with a valve. Open the valve and hold a flame to the end. If the gas ignites and burns with a pale blue or violet flame, you're making good gas. If it won't light or burns with a yellow, sooty flame, your temperature is too low or you're pulling too much air (lean mixture) or not enough air (rich mixture). Adjust your air intake and give it time to stabilize. Connecting to an engine: You need a mixer valve that allows you to blend gasoline and wood gas during startup and transition. Cold engines don't run well on wood gas alone—you need gasoline or propane to get the engine warm. Once it's running and warm, you gradually close the gasoline valve and open the wood gas valve. The engine will stumble, maybe even stall the first few times you try this. That's normal.
You're learning the transition point. Once running on wood gas, the engine sounds different—a bit rougher, slightly lower RPM for the same throttle position. That 30% power loss is immediately noticeable. Your truck that could spin tires on pavement will now accelerate like you're towing a trailer. Wayne Keith ran a gasified 8L V10 Dodge Ram for two years, mostly below 30 MPH, and he reported heavy trailers were no problem at that speed. Don't expect highway performance. For generator applications, the experience is better. A stationary engine running at constant RPM is the ideal use case. You can dial in the gas mixture for that specific load and leave it there. Some builders report running generators for hours at a stretch with minimal attention once the system is properly tuned. Fuel consumption during operation: a moderately large gasifier can run for about 14 hours on one fuel load, and you can replenish during operation if you're careful. The fuel column is basically a slow-burning, self-feeding system—the top layer dries from convected heat while the bottom burns. Add fuel through the top hatch when the level drops below the top of the reduction zone, but do it quickly to minimize air intrusion. Shutdown: close your air intake valve and let the reactor burn down naturally, or close off the gas outlet and let it smother itself. Don't dump water into a hot reactor—thermal shock can crack welds and warp steel. Let it cool overnight before dumping the ash.
Safety: The Part Where I Scare You (Because I Should)
Wood gas is 20% carbon monoxide by weight. At atmospheric concentrations of just 0.03%, carbon monoxide causes unconsciousness. At 0.5%, it kills. Carbon monoxide is odorless. It's lighter than air, so it rises and accumulates in enclosed spaces. You cannot smell it. You will not know you're being poisoned until you're too impaired to save yourself. Never operate a gasifier indoors. Not in a garage with the door open. Not in a barn with 'good ventilation.' Not in a workshop with fans running. Outside. Period. Every joint and connection in your system must be airtight, and you need to test for leaks constantly. A small leak that wouldn't matter on a propane system will kill you with wood gas. The worst problems with gasifiers result from leaks in the system. Gaskets fail. Welds crack from thermal cycling. Hose clamps loosen. You need to treat your gasifier like a pressurized vessel full of poison (because it is). Invest in a carbon monoxide detector with an alarm—mount it near where you're working and check the batteries before every run. Fire risk: the reactor shell gets hot enough to glow red in the dark. Anything combustible near the gasifier will ignite. Mount your system on a steel frame with clearance from wood, grass, and fuel storage. Have a fire extinguisher within arm's reach—rated for metal fires, not just Class A/B/C. Magnesium fires (if you used any magnesium components, which you shouldn't) require a Class D extinguisher. Water on a gasifier fire can cause a steam explosion. Pressure relief: your reactor needs a pressure relief mechanism. If the gas outlet gets clogged and pressure builds, the reactor can rupture or blow a seal, spraying hot char and gas. A simple pop-off valve rated for high temperature prevents this. Mount it on the reactor and set it to release at a safe pressure threshold.
Tar handling: the condensed tar you drain from your cyclone separator and cooling system is toxic, flammable, and persistent. Don't dump it on the ground—it contains polyaromatic hydrocarbons (the same carcinogens in cigarette smoke and diesel exhaust). Store it in sealed metal containers and dispose of it properly. Wear gloves when handling it. The shit does not wash off easily and it will stain everything it touches. Legal consideration: depending on where you live, operating a wood gasifier on public roads may violate emissions regulations. Check local laws. For off-grid property use and emergency scenarios, you're generally clear, but don't assume. The EPA and state regulators have opinions about combustion devices, and ignorance is not a defense. I'm not trying to talk you out of building this. I'm trying to keep you alive while you do it. Gasifiers are dangerous in specific, manageable ways. Respect the dangers, engineer controls for them, and you'll be fine. Ignore them because you're in a hurry or you think you're careful enough, and you'll end up as a cautionary tale on a prepper forum.
Frequently Asked Questions
Can I really build a working gasifier from scrap parts, or do I need machining equipment?
Yes, you can genuinely build a functional gasifier from scrap steel using basic welding skills. During WWII, a million gasifiers were built under resource scarcity from whatever materials people could scavenge—5-gallon steel drums, old propane tanks, sections of pipe. The critical factor is that everything must be steel (for heat tolerance) and airtight (for safety and efficiency). You don't need a machine shop. You need a welder, basic cutting tools, and the patience to test your seals. The shape and construction material matter far less than proper air nozzle placement and good filtration downstream.
How much power loss should I actually expect, and will my truck still be drivable?
Expect about 30% power loss compared to gasoline. Your truck will run, but acceleration and top speed will be significantly reduced. Wayne Keith drove a gasified 8L V10 Dodge Ram for two years, mostly below 30 MPH, successfully pulling heavy trailers at that speed. For highway driving or steep grades, wood gas is marginal. For farm work, local hauling, and stationary generator use, it's completely viable. The WWII drivers adapted by planning shorter routes and accepting slower speeds—it was transportation when the alternative was staying put.
What's the real-world fuel consumption, and how far can I drive before refueling?
The rule of thumb is 20 pounds of dry wood equals approximately 1 gallon of gasoline in energy content. If your vehicle normally gets 15 miles per gallon, expect roughly 15 miles per 20 pounds of wood. For a 100-mile trip, you'd need about 130 pounds of fuel. The WWII operators dealt with this by mounting large hoppers on truck beds. For stationary generator use, fuel consumption is less of a logistics problem—you just stack cord wood next to the unit and feed as needed. A moderately large gasifier can run about 14 hours on one fuel load.
Is the FEMA gasifier design actually worth building, or should I skip straight to an Imbert design?
The FEMA gasifier works but produces significant tar that requires constant engine maintenance. It's an emergency design meant to get vehicles running quickly when fuel disappears—think last resort, not daily driver. If you're building now with time to learn and iterate, go with an Imbert-style design. The strategically placed air nozzles at the constriction point force all tar through the hottest combustion zone, cracking it into cleaner gases. You'll spend less time tearing down your engine and more time actually running the system. Save the FEMA plans as a backup if you need to build something fast in a genuine crisis.
How dangerous is the carbon monoxide risk, and what specific precautions do I actually need?
The danger is absolutely real and has killed people. Wood gas is 20% carbon monoxide, and atmospheric concentrations of just 0.03% cause unconsciousness. It's odorless—you will not smell it before you're incapacitated. Never operate a gasifier indoors, even in a 'well-ventilated' garage. Every connection must be airtight and tested with soapy water for leaks. Mount a battery-powered carbon monoxide detector near your work area and check it before every run. Treat the system like a pressurized vessel full of poison, because that's exactly what it is. Respect these precautions and you'll be fine. Ignore them and you're gambling with brain damage or death.
Can I use any type of wood, or does the fuel source really matter that much?
Fuel quality is where most DIY builds fail. You need dry wood—below 20% moisture content—because wet wood wastes heat boiling water instead of gasifying fuel. You need uniform size (1-3 inch chunks) because irregular fuel bridges and creates hollow cavities that disrupt airflow. Hardwoods are better than softwoods due to higher density and lower resin content. Store-bought wood pellets are ideal for learning because they're already dry and uniform. If you load your beautiful gasifier with green firewood you chainsawed yesterday, you'll get weak gas, temperature drops, and tar everywhere. Fuel preparation matters as much as reactor design.
What engine modifications do I need, and is it reversible if I want to switch back to gasoline?
Engine modifications are surprisingly minimal. You need a mixer valve that lets you blend wood gas and gasoline (or propane) during startup and transition. The wood gas line connects to your air intake upstream of the carburetor. Once the engine is warm, you gradually close the gasoline valve and open the wood gas valve. The engine runs on wood gas just like it would on gasoline, using the vacuum from the intake stroke to pull gas from the gasifier. The modifications are completely reversible—disconnect the wood gas line, close that valve, and you're back to running on gasoline. For stationary generators, the setup is even simpler because you're not dealing with vehicle integration.
How long does the filtration system last before I need to clean or replace components?
It depends entirely on your fuel quality and upstream system performance. If you're running dry, uniform wood through a properly designed Imbert gasifier, you might go 20-40 hours between filter media changes. If you're running marginal fuel through a FEMA-style gasifier, you could be cleaning filters every few hours. The cyclone separator and cooling radiator need to be drained of condensed tar and water after every run—that's not optional. The filter box media (wood shavings, cloth, or steel wool) gets replaced when flow restriction increases noticeably. If your filters are clogging constantly, your problem isn't the filter—it's earlier in the system, probably fuel moisture or insufficient combustion temperature.
Conclusion
Wood gasification isn't a fantasy technology from a steampunk novel. It's proven, field-tested engineering that kept a million vehicles and generators running when petroleum stopped flowing. You can build a working system from scrap steel and run engines on wood you cut from your own property. The chemistry is straightforward. The dangers are manageable if you respect them. The power output is reduced but sufficient for most homestead and emergency applications. This is real independence from fuel supply chains, and it works. The question isn't whether wood gasification is viable—history already answered that. The question is whether you're willing to invest the time to learn the system, accept the performance tradeoffs, and maintain it properly. If you've got land with trees, mechanical aptitude, and a genuine need for off-grid power generation, start small. Build a simple gasifier to run a generator. Learn how fuel quality affects gas production. Master the filtration system. Then scale up if it makes sense for your situation. The knowledge is out there, the materials are available, and the technology is waiting for you to use it. If you want to learn more about building resilient, off-grid systems that work when everything else fails, join the waitlist at https://survivalbrain.ai/#waitlist for early access to SurvivalBrain—$149 during early access, $50 off the regular price. No internet required, no surveillance, just knowledge that works when you need it most.
Get Early Access to Uncensored Offline AI
Join the waitlist for SurvivalBrain launching Q1 2026. Early supporters lock in $149 lifetime pricing (save $50).
Lock In $149 Pricing